Showing posts with label brayer. Show all posts

Wednesday, July 10, 2013

SNS117

A NEW challenge for me Sketch N Stash challenge #117. So the sketch is on their blog. It's a pretty sketch and fairly simple to work with. I used my brayer and Pool Party, Marina Mist and Gumball Green inks to brayer my Whisper White cs. Ranger Adirondak Pitch Black ink on my tree and to distress the edges of my image. I used my Lucky Limeade marker to dab some color to the tree's branches. The dsp is from Stampin' Up! as well as the little silver florettes. I am so pleased with the way this one turned out. Hope you like it too and will pop on over to SNS and play along with the challenge.

TFL
T%dles Peeps!
Betty J Schaub
Enhanced by Zemanta

Friday, November 9, 2012

CTD217

Color Throw Down #217 - Basic Black, Whisper White, Lucky Limeade, and Not Quite Navy. Ok can I just start by saying, I LOVE THIS COLOR COMBO!!!

Of course my inks are all Stampin' Up! and exactly the ones requested in the challenge. I brayered Not Quite Navy for my sky and Lucky Limeade for my ground. I stamped the image and sentiment in Basic Black. The stamps are from the Come to Bethlehem set #120591. I punched two pieces of black with the Modern Label Punch #119849. The chipboard is not Stampin' Up! but the stars are Whisper White punched with a discontinued punch.

Don't forget to check out the DT samples on the Color Throw Down blog.

TFL
T%dles Peeps!
Betty J Schaub
www.bettystampstx.stampinup.net
 

Wednesday, June 20, 2012

Eiffel

I was playing with an idea I got from a photograph I saw on FB. Paris with a bit of fog...
So I brayered Stampin' Up! Rose Romance and Basic Grey ink onto a piece of glossy white cs. Then I stamped the Eiffel Tower from Artistic Etchings #120573 Crumb Cake ink. Then I stamped the trees from Lovely as a Tree #127793. Then I masked off the lower portion of the scene and I used the more squatty tree from the same set and stamped in Lucky Limeade randomly. For the roses I used the small rose from Happiness Shared (discontinued) #120534 with the Real Red, Daffodil Delight and Lucky Limeade markers. I  colored the stems with the Lucky Limeade and using the Real Red & Daffodil Delight markers I tapped on color to the flower itself. Then I huffed and stamped. I colored in the open spaces of the roses with the markers. I then added some extra green around my trees and shrubs with the Lucky Limeade marker. Using a sponge I tapped in some Real Red on the trees. When that was done I went over the upper portion of the scene with a paint brush I loaded with Whisper White ink to create the haze.

Hope you like this little creation. I sure enjoyed putting it together.


TFL
T%dles Peeps!
Betty J Schaub Independent Stampin' Up! Demonstrator
www.bettystampstx.stampinup.net

Wednesday, May 9, 2012

I Spy 14

I Spy #14 - Love the CAS sketch this week. I just brayered some Rich Razzleberry, Calypso Coral and Concord Crush onto my white cs. Then I used the Jumbo Roller Very Vintage across 3 times from top to bottom. Used some decorative paper for the 3 bars. Then I die cut come green cardstock for the branches and edged them with my marker. Added some Signo and called this one a wrap.

Check out the fabulous sketches offered at ISPY, I know you'll get inSPYred!

TFL
T%dles Peeps!
Betty J Schaub
www.bettystampstx.stampinup.net

Friday, February 3, 2012

CASE-ing Michelle Zindorf

I tried to CASE The Path Tutorial #483 by Michelle Zindorf. Her card was created using Stampin' Up! Well Worn Designer Series Paper, item number 122359. I didn't have any of that dsp so I just grabbed a scrap I had laying around.
Where Michelle's card used shades of browns, for my card (since my base paper was a green with a grass pattern) I chose to use Always Artichoke and Old Olive, Pool Party, Marina Mist and Island Indigo with Early Espresso.

I LOVE just about everything Michelle does so for me to attempt her tutorials is quite high praise and flattering to her.

Thanks Michelle for the inspiration.

TFL
T%dles Peeps!
Betty J Schaub
www.bettystampstx.stampinup.net

Friday, October 14, 2011

Leaves of a Tree - JFF

The tree is from Stampin' Up! It's item # 123846 and can be purchased HERE. The sentiment is from Day of Gratitude which is item #120835 and can be purchased HERE. If you buy both sets from me at the same time I'll give you $2.00 off.

To make my card I brayered the background. Then I stamped the tree in pumpkin pie ink. Then with my markers: More Mustard, River Rock, Crumb Cake, Calypso Coral, and Cajun Craze I colored the various leaves. The tree trunk was colored in using Early Espresso. Then I highlighted with the Signo Gel Pen.

I then punched 2 bats and folded them in half to make my hinges. Sponged some Always Artichoke around the edges, matted with black on Pumpkin Pie cs. Called it done!

If you'd like to purchase the stamps mentioned in this post please contact me at 2schaubs@sbcglobal.net . Thanks

T%dles Peeps!
Betty J Schaub Independent Stampin' Up! Demonstrator
www.bettystampstx.stampinup.net

Thursday, September 15, 2011

Brayered FYI - Thanks Peggy Toole

Thanks to Peggy Toole I played along in the For Your Inspiration Challenge today.
Here's the inspiration piece....
And here's my take....
Hope you like it!

On another note...
I CASE-D my Friend Laurel's creation here. Laurel actually decorated her project.


I left mine simple. I used a sheet of the NEW SU DSP Mocha Morning Specialty #122366. These were called TeePees but I like them as simple table top decore or as Christmas Trees.
TFL
T%dles Peeps!
Betty aka ZacksNana
Betty Stamps (SHOP ME) 24/7

Sunday, May 1, 2011

happy father's day - JFF - worst critic

Sometimes, I can be my own worst critic. But once this card was completed, I just kept thinking I could have done a better job with the sun in the upper right hand corner. I like everything else about this card, but that one corner just chaps my hide! Have you ever seen a straight line of distinction between the sun and the blue of the sky? No! Neither have I. But what's done is done. I will have to chalk that one up to experience and say, "I'll do better next time." Still I wanted to share. If you've ever had a dissappointment moment like mine I'd love to hear about it. Just leave me a comment. How did you handle it? Did you simply let it go like I did or did you start all over again from scratch. I'm just wondering, you know, inquiring minds want to know.


TFL
T%dles Peeps!
Betty aka ZacksNana
Betty Stamps TX (SHOP)

Tuesday, March 29, 2011

Brayer Challenge!!!! - JFF

Hello!
Today I am going to offer you a challenge. Do you own a brayer? Don't know what to use it for? Well, I will show  you in this little "talk you though it" tutorial.
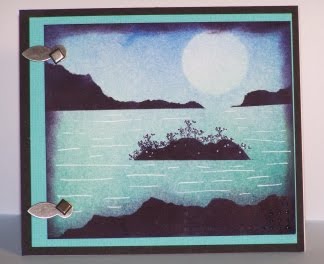
Below is my card.
Here's the deets:
Stampin' Up!
Cardstock: Whisper White, Basic Black
Stamps: Fresh Cuts, Whimiscal Words
Inks: Basic Black, Dusty Durango, Bermuda Bay
Stampin' Up Accessories: Build a Bird 2 Step Punch, Decorative Label Punch, Clear Embossing Powder, Two - Way Glue, Dimensional Adhesives, finger daubers
Tutorial:
Cut one piece of Whisper White cardstock 4 3/4" x 4 3/4" square.
Cut one piece of Basic Black cardstock 4 7/8" x 4 7/8" square.
Cut one piece of Whister White 5" x 11" and fold in half. Finished card will be 5" x 5".

1.In the Center of the 4 3/4" x 4 3/4" piece of Whisper White you will stamp the Fresh Cuts stamp in Basic Black and heat emboss with cleat embossing powder.
2. With a fresh finger dauber you will rub on the Bermuda Bay ink pad and then rub off on your embossed cardstock. Add as little or as much as you like. I went a little heavier around the edges and lighter in the center. Then heat emboss with clear embossing powder.
3. Open your Dusty Durango ink pad and ink up your brayer.
Brayer Dusty Durange from the upper right hand corner to the lower left hand corner on the diagonal. I slightly turned my cardstock so the corners were pointing north and south. TIP* once you start across the paper don't stop until your brayer runs out of ink.
4. Turn your cardstock to the right 2 times so the the opposite ends are pointing north and south. Ink up your brayer and apply to the cardstock. Continue until all ink is gone from your brayer. Look at your piece. Are you happy with the coverage? If not, repeat steps #3 & #4.
5. Take your Build a Bird punch and punch one bird and one wing.
Daube on some Bermuda Bay and Dusty Durango. Daube Dusty Durango to the wing. Adhere the wing with a dimensional adhesive. Set aside.
6. With the Build a Bird punch, punch 20 of the branches in Whisper White. With 2 way adhesive attach the branches to the cardstock to frame the image. Add your little bird with another dimensional adhesive.
7. Stamp the "Thoughts" sentiment with Basic Black on Whisper White cardstock. Daube Bermuda Bay. Then punch the sentiment out with the Decorative Label Punch, punching as close to the right side of the words as possible. This way you will have the excess to score and fold under. Daube Dusty Durango around the edges. Set is aside.
8. Attach your brayered image to the Basic Black square.
9. Attach the little bird to the brayered image.
10. Attach the sentiment with dimensional adhesives.
11. Attach the entire piece to your card base.
You're Done!!!

Now here's the challenge: Pull your brayer out of the drawer or packaging and dust it off and get to brayering. If you create a project using your brayer link it up to me and come back and add a DIRECT link in your comment.
I'll go visit and check out your project (because I am anxious to see what you create).
On Friday I will pick from the entries and I will give away a BRAND SPANKIN' NEW Stampin' Up! set.
Thanks so much for your interest and your comments. They help me trendously to keep on creating. I sure hope you liked my "talk you through it" tutorial. I am still not too good with the video thing yet. Besides, I mostly create by the seat of my pants so setting up the camera in advance doesn't always work out for me.

If you have any questions about the products used in this card creation please feel free to post them in your comments
.
Have a wonderful and I hope you get to brayering!
T%dles Peeps!
Betty aka ZacksNana
Betty Stamps TX

Thursday, November 18, 2010

Merry Christmas - Winter - PCS22

Merry Christmas - Winter - PaperCraftStar challenge #22 - Christmas tree or ornament card. I chose to use Lovely as a Tree, Itty Bitty Backgrounds and All Year Cheer III stamps from Stampin' Up! I brayered the sky and then the ground with Post-Its and Bashful Blue and Marina Mist ink from Stampin' Up! I used the fir tree stamp to add some foiliage at the base and sides of my image. All of the trees were stamped using SU Crumb Cake ink.
Thanks for Looking
T%dles Peeps!
Betty aka ZacksNana
Betty Stamps TX

Thursday, September 30, 2010

CASE-ing Zindorf Two Bucks tutorial #364

Two Bucks - winter scene. When I got Michelle Zindorf's FeebBlitz in e-mail today I just knew I was going to attempt this. And guess what!? I am sooo proud of myself. I think it turned out PDG!
Hope you like too.
Trees are Stampin' Up! - Lovely as a Tree set
Deer are Layers of Color - Reindeer Waltz

TFL
T%dles Peeps!
Betty aka ZacksNana

Sunday, June 13, 2010

The Greates Dad There Ever Was... - CSCC83

The Greatest Dad There Ever Was... _ Cinema Saturday Creative Challenge #83 - The Greatest Game Ever Played use some argyle. My oh my, this was a challenge for me. I don't like golf, but I did watch the movie when it first came out on DVD. But couldn't tell you much about it, except:
Here is a summary of this movie from ImDb:


" Near the turn of the twentieth century, young Harry Vardon becomes a champion golfer but learns that his amazing skill is no match for the class boundaries that exclude him from "gentlemanly" English society. A dozen years later, a young American, Francis Ouimet, fights against the same prejudice, as well as his own father's disdain, for a chance to participate in the U.S. Open against his idol -- Harry Vardon. The struggles of both men for acceptance provides the background for an amazing contest of skills."
 
Inside my card:
Dad,
Whether you're lending support,
giving advice, solving a problem,
or just having fun, you put love
into everything you do.
 
Thanks for being the GREATEST DAD anyone could EVER have.
 
Happy Father's Day
 
 
Hope you'll check it out and play along with the gals at Cinema Saturday. We always have so much fun!
 
TFL
T%dles Peeps!
Betty aka ZacksNana

Saturday, June 12, 2010

Friend makes it easy - PPC-CC16


a friend is someone who makes it easy - PicturePerfectCreations-CraftyChallenges#16 - regal rose (pink), pacific point (ocean/turquoise blue), and sahara sand (greyish brown). I brayered with tempting turquoise, then with rose red and then I brayered along the bottom 1/3 of the cardstock with Archival Brilliance Pearlescent Beige. I masked off and daubered some tempting turquoise for my islands. Then I stamped over with some trees. I stamped some tall grasses across the bottom with the beige. I stamped some rose red flowers and finally I added a dragonfly to the sky. I highlighted with my white Signo gel pen. Stamped my sentiment and called it done.

If you want to participate your creation entry is due: Monday, June 14th by 10amEST.

They will choose 3 of the BEST submissions and feature them on the Picture Perfect Creations blog!--A Grand Creation Winner and two Runners Up! And you, as a crafty creator winner, will receive a button to display with extreme happiness and pride on your very own blog! How fun! :) Winners will be chosen the evening/night of Tuesday, June 15th.

TFL
T%dles Peeps!
Betty aka ZacksNana

Tuesday, June 1, 2010

Celebrate - LTTSC4

Celebrate - Texas Tues-Step with our Trail Boss Libby.
My image is a stamp but I can't remember where I purchased it from. So if you have any ideas please e-mail me so I can give credit where credit is due. I colored this little fellow with copics then I added Glossy Accents and let it dry over night. Then I brayered over him with SU creamy caramel, yoyo yellow and tempting tourquoise. The trees are a stamp from Deadbeat Designs (Thanks Mark). I stamped them in mellow moss. Then I chalked over them with some lime green. I chalked dark brown under the trees for shadows. I added highlights to the sky with my Signo gel pen. The brown grass is hand drawn with my Copics and shadowed with the dark brown.
Be sure and check out what the rest of the Posse has created this week.
StampinLibby the Trail Boss
Geeta
Shannan
Linda
Deadbeat Mark
And if you wanna play along just add your link HERE!
TFL
T%dles Peeps!
Betty aka ZacksNana

Friday, May 7, 2010

Gone a fishing - Just Fer Fun! CCC8

Congratulations on your retirement - I have laid aside business and gone a fishing. I just did this card for fun. I found these stamps in a box and they had NEVER been inked up so I felt I had to do them some justice. I created this card. Guess what, it SOLD! Yeppers, site unseen.
Deets: I stamped the trout with Stampibilities brown and heat embossed. Then I brayered a piece of whisper white cardstock with only orange, mellow moss, green galore and creamy caramel till I have the color pattern of ornage-y brown on the belly and lighter to darker green on the back and side. I added bugle beads and Signo white gel to the blue cardstock to simulate water glistening. I fashioned a hook for a piece of wire and hung it on a thread of rope adding a red bead for my bobber. For the sentiment on the base of the cardstock I stamped my sentiment in Stamabilities brown and heat embossed. I cut with a die and while the cs was still in the die I sponged coordinating colors. I punched 3 holes and added the black brads. Done, done and done!
Entered in the Crafty Calendar Challenge #8 for the month of May. The theme is "The Great Outdoors".
TFL
T%dles Peeps!
Betty aka ZacksNana 

Sunday, May 2, 2010

Blake's High School Graduation - brayer scene

My hub's cousin's oldest is graduating this month. We have watched Blake grow from the nine months in his mom's tummy to a handsome 18 year old man. Now it is time for Blake to graduate high school and go on to college. He has varied interests; music, girls, his truck, girls, playing guitar and oh did I mention GIRLS??? Well, it's no wonder. He plays guitar and sings. What girl wouldn't swoon? Anyhoo, here is the card I made for Blake. I brayered the background with SU ballet blue (sky), mellow moss (ground) and then I masked off the road spot and added creamy caramel. I have a little tiny grass stamp from a Hanna Stamps set and I just inked it up with the mellow moss and stamped all over the ground. Then I went over it with my black Copic marker. I inked it again with creamy caramel and stamped it in an upward line on the road to make ruts. The truck is a stamp from Deadbeat Designs. I stamped it and colored with Copics and Permapaque' Markers. It was too big so I scanned it, resized and printed in a much smaller size. I added white Signo gel ink to the bumper, tail lights and mirrors. My trees are also a stamp from Deadbeat Designs. I used my aqua painter with mellow moss to color my trees. Stamped Congratulations in ballet blue (stamp is from SU!). Lastly, I added some Signo white gel to the sky.

Inside sentiment:
Blake,
If you ever wonder whether you have
what it takes to succeed,
just remember this moment...
and all the love and pride that surround you
as you graduate.
Congratulations, Let the Journey Begin!

TFL
T%dles Peeps!
Betty aka ZacksNan

Thursday, April 29, 2010

Rest In Peace

My husband's cousin Cher (Cheryl) lost a long and arduous battle with cancer on Monday, April 26, 2010. This is a sympathy card for her parents and siblings. Cheryl Denise Stewart, may she rest in peace.

TFL
T%dles Peeps!
Betty aka ZacksNana

Wednesday, April 28, 2010

Here Comes The Sun - EBAC88 Song

Here Comes the Sun - Everybody Art Challenge #88 inspiration is a Song. My song is Here Comes the Sun written by George Harrison and sung by The Beatles. Below are the song lyrics:
Here comes the sun, here comes the sun,

and I say it's all right

Little darling, it's been a long cold lonely winter
Little darling, it feels like years since it's been here
Here comes the sun, here comes the sun
and I say it's all right

Little darling, the smiles returning to the faces
Little darling, it seems like years since it's been here
Here comes the sun, here comes the sun
and I say it's all right

Sun, sun, sun, here it comes...

Little darling, I feel that ice is slowly melting
Little darling, it seems like years since it's been clear
Here comes the sun, here comes the sun,
and I say it's all right
It's all right
My card was created using Michelle Zindorf's tutorial #319 Monochromatic Reflection.
 
TFL
T%dles Peeps!
Betty aka ZacksNana

Saturday, April 24, 2010

Sympathy - PCPCUTTLEBUG68

Ok, I thought I'd get this week's challenge posted early. I have finally gotten ahead of the game for once. Don't count on it lasting though. :O)
This week I would like you to use Shapeabilities dies as a stencil.
I started out with my Top Note die. I cut 2. Then I trimmed along the dashes on the first one. I took the trimmed piece and brayered with Mellow Moss, then Glorious Green. Then I turned the piece around and brayered Glorious Green, Only Orange and Barely Banana.
Then, I die cut my cross out of a piece of white cardstock. Then I taped my Shapeabilities cross die on that piece of cardstock. Using the die and cardstock as a stencil. I sponged over the entire cross with Basic Black. I also sponged/tapping along the edges. I took the second Top Note die cut piece and matted my image. I matted all of that on a piece of black cardstock to which I added some eyelets to the corners. Matted it all on orange cardstock. Remember to tag your creations pcpcuttlebug68

Hopefully I haven't confused you too terribly with my description. If you don't have any Shapeabilites just use a Nestie or Borderabilites as your stencil.
TFL
T%dles Peeps!
Betty aka ZacksNana

Tuesday, April 20, 2010

More Brayer Fun!

Don't look too closely you will see a lot of boo boos.

that's mine up there. HERE is Michelle's.
TFL
T%dles Peeps!
Betty aka ZacksNana

Miscellaneous

Graduation 2018 O